How to integrate Neon DB with Next js: A better Planetscale alternative
-
 Hashan Hemachandra
 - 20 Sep, 2024

In the dynamic landscape of web development, choosing the right technologies can make or break your project. Next.js, Prisma, and PostgreSQL are a powerful trio for building robust, scalable web applications. However, with Planetscale discontinuing their free hobby tier plan, developers are seeking cost-effective and efficient alternatives. Enter Neon DB—a modern, serverless PostgreSQL solution that fills the gap left by Planetscale.
In this comprehensive guide, we’ll walk you through integrating Next.js with Prisma and PostgreSQL using Neon DB. We’ll cover everything from setting up your development environment to deploying your application. By the end, you’ll have a fully functional Next.js app connected to a Neon DB PostgreSQL database.
Why Consider Neon DB as a PlanetScale Alternative?
While PlanetScale is well-known for its Vitess-powered MySQL compatibility, it may not be the right choice for all projects. Here are a few reasons why Neon DB could be a compelling alternative:
-
PostgreSQL Support : Unlike PlanetScale, which is based on MySQL, Neon DB is a cloud-native PostgreSQL database, making it a powerful option for developers who prefer PostgreSQL’s advanced feature set like rich indexing, JSONB support, and transactional consistency.
-
Serverless and Auto-scaling : Neon DB provides serverless architecture like PlanetScale but also offers auto-scaling capabilities, ensuring you only pay for what you use. This can be a big advantage for apps with unpredictable or seasonal traffic.
-
Seamless Integration with Next.js and Prisma : Just like PlanetScale integrates with frameworks like Next.js, Neon DB works exceptionally well with Next.js and Prisma, allowing you to develop performant, modern applications with a fully type-safe ORM (Prisma) and flexible cloud PostgreSQL solution (Neon).
Setting Up Neon DB
Let’s first create a new Neon DB instance
Step 1: Create a Neon Account
- Head over to Neon’s website and sign up for a free account.
- Once logged in, navigate to the dashboard.
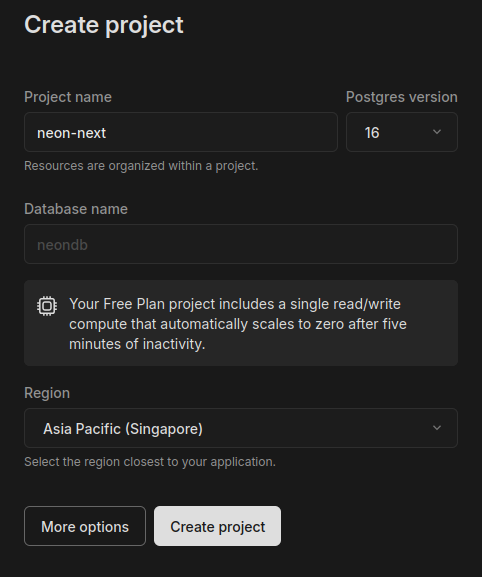
Step 2: Create a New Project
- You’ll be prompt to create a new project.
- Select a name for your project and database, then select a reigon. Also you can choose the postgress version as well, if you want.

- Neon will automatically provision a PostgreSQL instance for you.
Step 3: Get the Database Connection String
- Once your project is created, Neon will provide you with a connection string. Since we are planing on using Prisma ORM, you have to select Prisma on the given list. It will look something like this:

schema.prisma
// prisma/schema.prisma
datasource db {
  provider  = "postgresql"
  url  	    = env("DATABASE_URL")
  // uncomment next line if you use Prisma <5.10
  // directUrl = env("DATABASE_URL_UNPOOLED")
}
.env
DATABASE_URL="postgresql://neondb_owner:***********@ep-lingering-queen-a1875mgh-pooler.ap-southeast-1.aws.neon.tech/neondb?sslmode=require"
# uncomment next line if you use Prisma <5.10
# DATABASE_URL_UNPOOLED="postgresql://neondb_owner:**********@ep-lingering-queen-a1875mgh.ap-southeast-1.aws.neon.tech/neondb?sslmode=require"
Initializing a Next.js Application
Now, let’s set up our Next.js application.
Set up a New Next.js Project
Open your terminal and run the following command:
npx create-next-app@latest
Follow the prompts to configure your project.
What is your project named? neon-next
Would you like to use TypeScript? No / Yes
Would you like to use ESLint? No / Yes
Would you like to use Tailwind CSS? No / Yes
Would you like your code inside a `src/` directory? No / Yes
Would you like to use App Router? (recommended) No / Yes
Would you like to use Turbopack for `next dev`?  No / Yes
Would you like to customize the import alias (`@/*` by default)? No / Yes
What import alias would you like configured? @/*
Install and Configure Prisma
Install prisma inside your project
npm install @prisma/client prisma
Next, we will initialize Prisma. Run the following command to initialize Prisma in your project
npx prisma init
This command will create a prisma directory and a .env file. The .env file contains the DATABASE_URL, which we will replace with the Neon DB connection string.
Open the .env file and update the DATABASE_URL to use the connection string from Neon DB:
.env
DATABASE_URL="postgresql://neondb_owner:***********@ep-lingering-queen-a1875mgh-pooler.ap-southeast-1.aws.neon.tech/neondb?sslmode=require"
# uncomment next line if you use Prisma <5.10
# DATABASE_URL_UNPOOLED="postgresql://neondb_owner:**********@ep-lingering-queen-a1875mgh.ap-southeast-1.aws.neon.tech/neondb?sslmode=require"
open schema.prisma file and add the below snippet to it
schema.prisma
// prisma/schema.prisma
datasource db {
  provider  = "postgresql"
  url  	    = env("DATABASE_URL")
  // uncomment next line if you use Prisma <5.10
  // directUrl = env("DATABASE_URL_UNPOOLED")
}
Now let’s add a simple User model with three fields, the file should look like below
prsiam.schema
datasource db {
  provider = "postgresql"
  url      = env("DATABASE_URL")
}

generator client {
  provider = "prisma-client-js"
}

model User {
  id    Int    @id @default(autoincrement())
  name  String
  email String @unique
}
Migrate the Database
Run the following command to create a migration and apply it to the Neon DB
npx prisma migrate dev --name init
This command will create a migration file and execute it, updating the Neon DB schema.
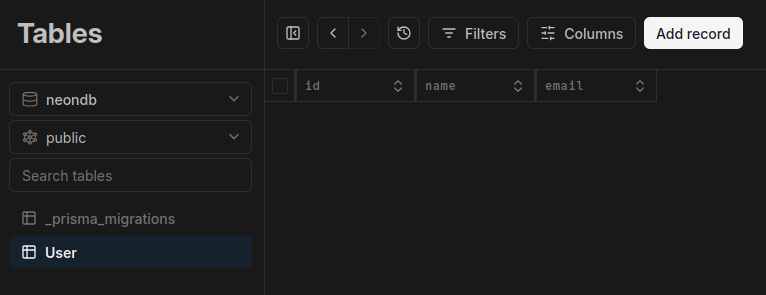
Now if everything we have done so far is correct, then there should be a User table inside the Tables panel in Neon DB dashboard with fields we applied

Also terminal will show a success prompt like below.
Environment variables loaded from .env
Prisma schema loaded from prisma/schema.prisma
Datasource "db": PostgreSQL database "neondb", schema "public" at "ep-lingering-queen-a1875mgh-pooler.ap-southeast-1.aws.neon.tech"

Applying migration `20240920005743_init`

The following migration(s) have been created and applied from new schema changes:

migrations/
  └─ 20240920005743_init/
    └─ migration.sql

Your database is now in sync with your schema.

✔ Generated Prisma Client (v5.19.1) to ./node_modules/@prisma/client in 58ms
Now if all the above steps are successful, then we are goot to go. Let’s test it with an API call
Creating a Simple Data Model with Prisma
First of all let’s initalize a prisma client to connect to the database. And let’s cache it in the global varibale to avoid making new database connection everytime we use it.
In you Next.js project, create a new file in the folder called utils:
utils/db.ts
Add the following code to the file
db.ts
/** We do this thing only in development because how nextjs do hot realoading. Everytime when we save
 * a file, it will be hot reloaded or hot refreshed and it will mess up the database connection and it will
 * just breake eventually. After like 10 hot reloads it'll be like I don't have any more capacity to make
 * a database connection. So this file prevents that from happening.
  */

import { PrismaClient } from '@prisma/client'

// globalThis is a method in Node, it's basically like the global Space we are writing on
const globalForPrisma = globalThis as unknown as {
  prisma: PrismaClient | undefined
}

export const prisma =
  globalForPrisma.prisma ?? // Checking if Prisma is there first
  new PrismaClient({ // and if it's not then make it, then assign it to a variable called prisma
    log: ['query'],
  })

// if we are not in production, add that to the global prisma
if (process.env.NODE_ENV !== 'production') globalForPrisma.prisma = prisma
Now let’s create an API to perform some CRUD uperations to test our connection with Neon DB
Create a new API route for users
In your Next.js project, create a new file in the app/api folder:
app/api/users/route.ts
Add the following code:
import { prisma } from "@/utils/db";
import { NextResponse, NextRequest } from "next/server";

export const POST = async (request: NextRequest) => {
  try {
    // Parse the incoming request to extract name and email
    const { name, email } = await request.json();

    // Create a new user using Prisma
    const user = await prisma.user.create({
      data: { name, email },
    });

    // Respond with the created user object
    return NextResponse.json(user, { status: 201 });
  } catch (error) {
    if (error instanceof Error) {
      return NextResponse.json({ message: error.message }, { status: 500 });
    } else {
      // Handle the case where it's not an Error instance
      return NextResponse.json(
        { message: "An unknown error occurred" },
        { status: 500 }
      );
    }
  }
};

export const GET = async () => {
  try {
    // Fetch all users using Prisma
    const users = await prisma.user.findMany();

    // Respond with the list of users
    return NextResponse.json(users, { status: 200 });
  } catch (error) {
    if (error instanceof Error) {
      return NextResponse.json({ message: error.message }, { status: 500 });
    } else {
      // Handle the case where it's not an Error instance
      return NextResponse.json(
        { message: "An unknown error occurred" },
        { status: 500 }
      );
    }
  }
};

export const DELETE = async () => {
  return NextResponse.json({ message: "Method not allowed" }, { status: 405 });
};
Performing CRUD operations
Creating Users
To create a new user, you can use the following POST request to /api/users:
curl -X POST http://localhost:3000/api/users \
-H "Content-Type: application/json" \
-d '{"name": "John Doe", "email": "john@example.com"}'
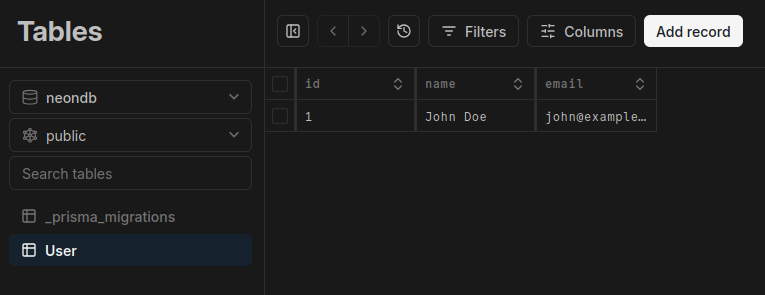
If your API is working correcrly, you can see the data is being saved inside the Neon DB table

Fetching Users
To retrieve users, send a GET request to /api/users
curl http://localhost:3000/api/users
Now we have sunccessfully intergrated Neon DB with Next js project using Prisma ORM for a PostgreSQL Database! Hope you find this tutorial helpfull. See you next time!

