How to create a waterfall like animation for table rows in React using Framer Motion
-
 Hashan Hemachandra
 - 30 Mar, 2024
Creating interactive and visually appealing web applications is an integral part of delivering a memorable user experience. One way to enhance your React applications is by incorporating animations. This is where Framer Motion, a powerful library designed specifically for React, comes into play. In this blog post, I’ll dive into a practical example of using Framer Motion to animate a table of data, showcasing how to make your applications more dynamic and engaging.
For this one I will use same code base I used to explain JavaScript Set() Object in previous week.
What is Framer motion?
Framer Motion is a popular open-source animation library for React that provides a powerful and easy-to-use toolkit for adding animations to your web applications. It’s designed to make implementing and managing animations straightforward, offering a wide range of features that cater to both simple and complex animation needs. Framer Motion is built on the principles of simplicity, performance, and flexibility, aiming to enhance the user interface with engaging and interactive animations.
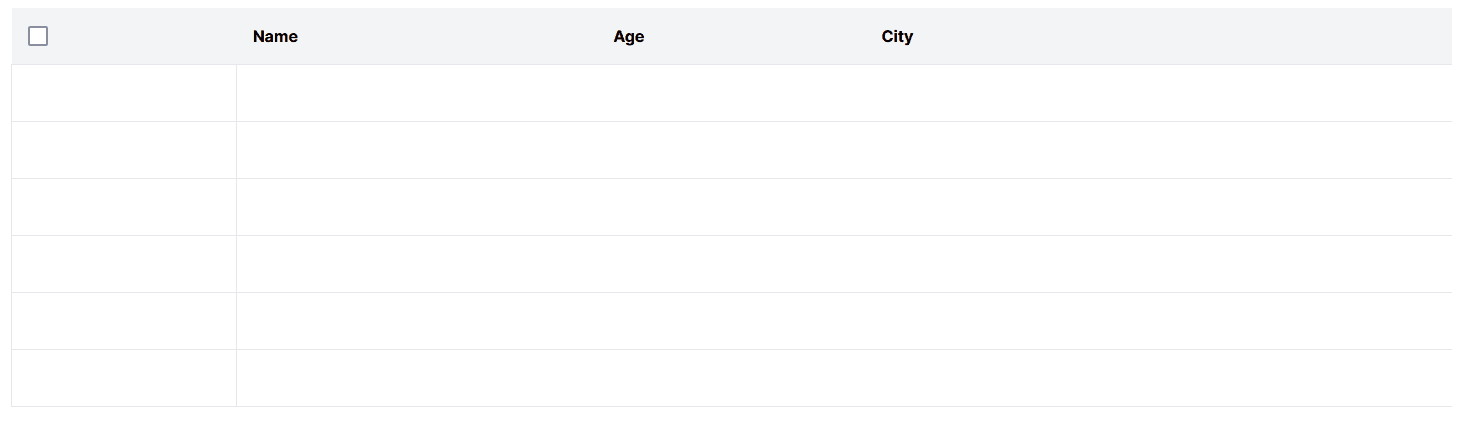
Expected Outcome
Currently our table is showing data without any animation. When page reload every row load at once. What I wanna achieve is, when page reloads, table row data should appear one by one like a waterfall. This will add appealing look to that table
Key Point
So to add a transition like waterfall, we have to understand that we have to delay the appearance of each row by it index where it get maps. Which means we have to pass the index of each row as a parameter to what ever the property which makes this delay inside the framer motion. Lucky for us, framer motion has this thing called Dynamic Variants to get this done.
Dynamic Variants.
Let’s first try to understand what is a Variant
We use Variants
to create animations that propagate throughout the DOM, and orchestrate those animations in a declarative way
It’s basically a predefined animation states that you’ve defined elsewhere in your code. For an example,
const variants = {
  visible: { opacity: 1 },
  hidden: { opacity: 0 },
}
Here, two states are defined: hidden and visible. Each state describes how elements should appear during these phase
They’re passed into motion components via the variants prop.
<motion.div variants={variants} />
What is a Dynamic Variant?
Each variant can be defined as a function that resolves when a variant is accessed. These variant functions are provided a single argument, which can be set in a component’s custom prop. For an example:
const variants = {
  visible: i => ({
    opacity: 1,
    transition: {
      delay: i * 0.3,
    },
  }),
  hidden: { opacity: 0 },
}

return items.map((item, i) => (
  <motion.li
    custom={i}
    animate="visible"
    variants={variants}
  />
))
Here is our Dynamic Variant
const variants = {
  hidden: { opacity: 0, y: -50 }, // Start position for the animation
  visible: (i: number) => ({
    opacity: 1,
    y: 0,
    transition: {
      delay: i * 0.1, // Delay each row based on its index
      duration: 0.5, // Duration of the animation
      type: "spring", // Use a spring type animation for a bounce effect
      stiffness: 100, // Spring stiffness, adjust for more/less bounce
      damping: 10, // Spring damping, adjust to change how the bounce behaves
    },
  }),
};
Here, two states are defined: hidden and visible. Each state describes how elements should appear during these phases. The hidden state makes the element completely transparent and slightly above its final position. The visible state transitions the element to fully opaque and moves it to its final position. The transition is customized to have a delay based on the element’s index, making each row animate in sequence rather than all at once.
Setting “TableRow” animation
{data.map((item,index) => (
  <motion.tr
    key={item.id}
    variants={variants}
    initial="hidden"
    custom={index}
    animate="visible"
  >
    ...
  </motion.tr>
))}
Let’s dive deeper into the explanation of the <motion.tr> element to understand its role in animating table rows.
The <motion.tr> Component
Framer Motion extends standard HTML elements to include animation capabilities. By prefixing an element type with motion., you make it animatable. In this case, <motion.tr> is an animatable version of the standard <tr> table row element. This allows you to apply animations directly to each row in your table.
Key Properties
variants={variants}: This property connects the<motion.tr>element to a set of predefined animation states or “variants” that you’ve defined above in your code. Thevariantsobject contains the animation definitions for the “hidden” (initial state) and “visible” (final state) states of the element, along with the transition details.initial="hidden": This sets the initial animation state of the element to “hidden” as defined in thevariants. When the component first mounts, it will start in this state.animate="visible": This tells Framer Motion to animate the element to the “visible” state, also defined in thevariants. This is the state the element will animate to after it’s initially rendered.custom={index}: Thecustomprop is a powerful feature that allows you to pass custom data into your animation variant functions. In this case, the index of each item in the map function is passed. Thisindexis used in thevisiblevariant to dynamically adjust the animation’s delay, creating a staggered effect where each row animates into view one after the other, based on its position in the list.
How It Works Together
When the component mounts, each <motion.tr> starts in the “hidden” state, meaning they are initially invisible and positioned slightly above their final position (as defined in the variants).
Upon mounting, Framer Motion automatically animates each row to the “visible” state. Because the transition to the “visible” state includes a delay that is based on the row’s index (thanks to the custom prop), rows will animate in sequence rather than all at once. This staggered effect is achieved by multiplying the index by a base delay (e.g., 0.1 seconds), so the first row has no delay, the second has a 0.1-second delay, the third has a 0.2-second delay, and so on.
Following is the finalized code:
"use client";
import { useState } from "react";
import { motion } from "framer-motion";

const variants = {
  hidden: { opacity: 0, y: -50 }, // Start position for the animation
  visible: (i: number) => ({
    opacity: 1,
    y: 0,
    transition: {
      delay: i * 0.1, // Delay each row based on its index
      duration: 0.5, // Duration of the animation
      type: "spring", // Use a spring type animation for a bounce effect
      stiffness: 100, // Spring stiffness, adjust for more/less bounce
      damping: 10, // Spring damping, adjust to change how the bounce behaves
    },
  }),
};

export default function Home() {
  const data = [
    { id: 23423, name: "Alice", age: 28, city: "New York" },
    { id: 75675, name: "Bob", age: 34, city: "San Francisco" },
    { id: 63456, name: "Charlie", age: 22, city: "Los Angeles" },
    { id: 49675, name: "Diana", age: 45, city: "Chicago" },
    { id: 50757, name: "Evan", age: 30, city: "Miami" },
    { id: 64878, name: "Fiona", age: 29, city: "Seattle" },
  ];

  const [selectedItems, setSelectedItems] = useState<Set<number>>(new Set());

  const handleSelectAll = (event: React.ChangeEvent<HTMLInputElement>) => {
    if (event.target.checked) {
      const allDataIds = new Set(data.map((item) => item.id));
      setSelectedItems(allDataIds);
    } else {
      setSelectedItems(new Set());
    }
  };

  const toggleItemSelection = (dataId: number) => {
    const newSelection = new Set(selectedItems);
    if (selectedItems.has(dataId)) {
      newSelection.delete(dataId);
    } else {
      newSelection.add(dataId);
    }
    setSelectedItems(newSelection);
  };

  return (
    <div className="flex flex-col justify-center items-center h-screen">
      <div className="w-3/4 mx-auto">
        <table className="text-left w-full border-collapse">
          <thead>
            <tr>
              <th className="p-4 bg-gray-100 border-b border-gray-200">
                <label className="w-full h-full flex cursor-pointer">
                  <input
                    className="form-checkbox h-5 w-5"
                    type="checkbox"
                    checked={selectedItems.size === data.length}
                    onChange={handleSelectAll}
                  />
                </label>
              </th>
              <th className="p-4 bg-gray-100 border-b border-gray-200">Name</th>
              <th className="p-4 bg-gray-100 border-b border-gray-200">Age</th>
              <th className="p-4 bg-gray-100 border-b border-gray-200">City</th>
            </tr>
          </thead>
          <tbody>
            {data.map((item,index) => (
              <motion.tr
                key={item.id}
                variants={variants} // Apply the defined variants
                initial="hidden" // Start with the 'hidden' variant
                custom={index} // Pass the index to the 'visible' variant for staggered animation
                animate="visible" // Animate to the 'visible' variant
              >
                <td className="border px-4 py-2 text-gray-600 ">
                  <label className="w-full h-full flex cursor-pointer">
                    <input
                      type="checkbox"
                      value={item.id}
                      className="form-checkbox h-5 w-5"
                      checked={selectedItems.has(item.id)}
                      onChange={() => toggleItemSelection(item.id)}
                    />
                  </label>
                </td>
                <td className="p-4 border-b border-gray-200">{item.name}</td>
                <td className="p-4 border-b border-gray-200">{item.age}</td>
                <td className="p-4 border-b border-gray-200">{item.city}</td>
              </motion.tr>
            ))}
          </tbody>
        </table>
        <p className="mt-10">Selected Items: {selectedItems.size}</p>
        <p className="mt-4">
          Selected IDs:{" "}
          {Array.from(selectedItems)
            .map((id) => id)
            .join(", ")}
        </p>
        <p className="mt-4">
          Selected Names:{" "}
          {Array.from(selectedItems)
            .map((id) => data.find((item) => item.id === id)?.name)
            .join(", ")}
        </p>
      </div>
    </div>
  );
}
Let’s look at the animation in real time:
Here is the Repo for your future reference. Please give ma a star for my repo if you think this is useful. Also please clap for the post. It’ll help me so much!
Until next time, Peace ✌️